Tag

Tips

Dropbox selective sync tutorial: Sync a folder to Windows from your Dropbox account

By Video

Learn how to add a new folder to be synced using Selective Sync in Dropbox for Windows.

Here’s what i want to do: I have a Dropbox account that’s my my business subfolder and there’s a folder missing, it’s called “Cheat sheets,” and I basically want to make sure that the folder which is stored in my Dropbox account syncs to my Windows PC. I’m not seeing it right here, so what I need to set up selective sync. This is how to do it.

Narrator Ian Lamont is the founder of i30 Media Corporation, publisher of IN 30 MINUTES cheat sheets & guides.

Dropbox links: 4 different ways to share Dropbox URLs

By Video

Today, I’ll be showing you four ways to create a link to a Dropbox file that you can share with other people. This approach works whether you’re using a Windows or a Mac although there are some slight variations on how you get the link depending on which operating system you’re using.

Dropbox: How to recover deleted files and folders using “Events”

By Video

I recently made a huge mistake in Dropbox. From my desktop computer, I deleted two folders — one shared, and one not — that collectively contained more than 9,000 files, including mission-critical files for my business. I watched in horror as Dropbox synced the deletion to my master Dropbox account, which then replicated to all other devices linked to the same Dropbox account.

Now, if you have read my book Dropbox In 30 Minutes or have seen some of my other videos, you know there is a relatively easy way to restore deleted Dropbox files using the Dropbox.com website. You can see the video here.

But, when you’ve deleted thousands of files and hundreds of folders, it’s a huge hassle to manually restore all of them. It can take hours to hunt around on Dropbox.com, find the trashed folders and files, and right-click to restore them.

Fortunately, Dropbox offers a way to get back all of the files and folders at once. It involves the “Events” tab on the Dropbox.com website, which is a list of all Dropbox activities (updates, deletions, etc.) going back one month. The video below describes how to do it. This is the method I used to get my 9,000+ files and folders back to the way they had been before.

Note that this method will not work if the deletion event took place more than one month ago. In addition, if you have added files and folders to your Dropbox account since the deletion event, it may cause issues when you try to restore using the Events link.

Without further ado, here’s the video:

Don’t make this mistake if you import a folder to Dropbox

By Blog

What’s the best way to import folders to Dropbox? A reader was wondering which of the following two setups worked best:

When I transfer a folder from my hard drive to the dropbox website, the hard drive copy of the folder stays there so the file is on both dropbox and the hard drive.

When I transfer a folder from the hard drive to the dropbox folder the hard drive copy of the folder is deleted and is just listed on dropbox so there is no file on the hard drive but just listed in the dropbox folder.

Which is correct? Should I have folders in both the hard drive and dropbox or dropbox only?

As I mentioned in my Dropbox book, It’s important to remember that the core feature of Dropbox is the ability to automatically synchronize anything that gets “dropped” into it, wherever it may be installed — the Dropbox folder on your desktop or laptop, the Dropbox app on your iPhone or Android phone, or Dropbox.com. It looks like this conceptually:

How Dropbox works - syncing

For this reader, the ideal approach would be to install Dropbox on your computer and then move the folder from your hard drive to your Dropbox folder on your hard drive (which will then sync with your Dropbox folder online and on any other computer using the same Dropbox account). Note that this does not delete the folder from your hard drive — it simply moves it from one location on your hard drive (for instance C:/My Documents/Janice) to another location on your hard drive (C:/Desktop/Dropbox/Janice). Whenever you update the file stored in your Dropbox folder on your computer, it will automatically sync to the other locations you have Dropbox installed as well as on Dropbox.com.

I do not recommend uploading the folder to Dropbox.com and deleting the folder on your hard drive (that is, without installing the Dropbox application on your computer). The reason: If something happens to your account (for instance, you can’t recover the password or Dropbox has a massive outage) you would lose the data or be unable to access it in that folder.

Another bad option: Copying the folder to Dropbox. This leads to two separate versions of each file in the folder (potentially thousands in all), and the potential for the unsynced versions of the files to be opened and edited.

What are Dropbox comments?

By Blog

What are Dropbox comments? In brief, Dropbox comments enable users to append comments and reference other collaborators from individual documents stored in Dropbox. This post will outline how Dropbox comments work, and serve as a review of the feature.

The idea of adding comments to a document is not new. Anyone who regularly shares Microsoft Office or MS Word documents with other people should be familiar with the commenting feature, which lets users attach comments to cells, phrases, and other elements within the documents. Google Docs also has a slick commenting feature.

Dropbox comments are a bit different. Rather than appearing inside of the document or file itself, they are appended to the Web preview of the document. In addition, Dropbox comments are not attached to specific elements within a document. That is, if I highlight a word in the preview and then type in the comments bar, the comment won’t be attached to that word as it would be in a Word doc. Dropbox comments can’t be edited, either, although it’s possible to do other things with them (see list, below).

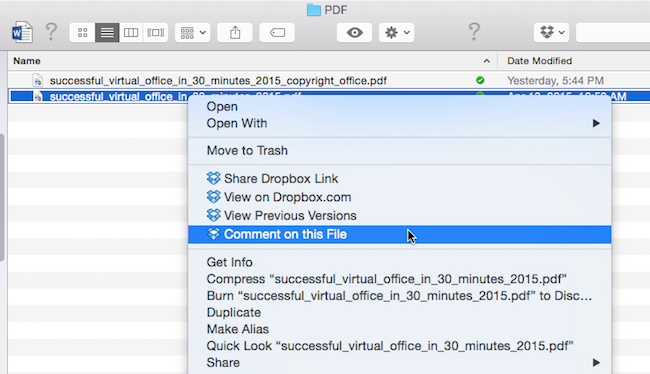
There are two ways to add a comment: From the Finder/Folder on your desktop, or via the Dropbox.com website. Here’s the view from Finder. Look for the “add comment” option when right-clicking on the selected file:
What is a Dropbox comment
Once making the selection, you’ll be brought to the Web preview on Dropbox.com (login required). You can also add a comment directly from Dropbox.com. Here’s the interface, with a preview of a Microsoft Word document (the manuscript for our Virtual Office book) on the left and a note to myself on the right:
Dropbox comment example with MS Word file
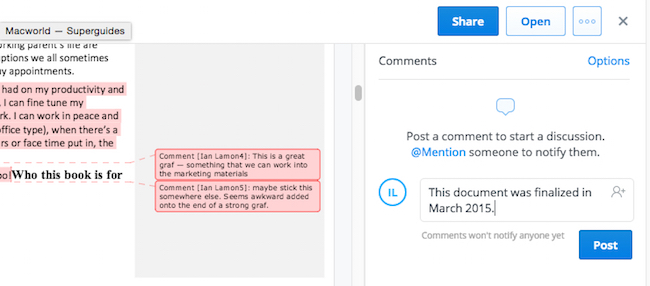
Clicking Post will add the comment. If it is a shared document, other people will see the comment, kind of like a shared Google Docs file.

Other features of Dropbox comments

Here is a short list of additional features:

  • The ability to “@mention” collaborators in a comment by adding an “@” symbol along with the person’s name. The person must be a collaborator in a shared Dropbox folder. He or she will be notified of the comment being added.
  • The ability to “like” comments by clicking a star underneath the comment.
  • The ability to resolve comments when an issue has been addressed or closed.
  • Comments can be deleted, but not edited.

The Dropbox comments feature is useful, especially considering they can be appended to files that normally can’t be commented on, such as image files. However, once the files leave Dropbox (for instance, via export or unsharing) the comments are not ported out. In addition, the comments feature does not appear in the Dropbox mobile app (I tried iOS 8.3), although I would expect Dropbox to at least add a comments previewing feature in the future.

Have you tried Dropbox comments? What do you think?

Dropbox: How to keep shared files if you are not the owner

By Blog

A reader of Dropbox In 30 Minutes, 2nd Edition, recently contacted me about a situation involving a shared folder filled with photos. His question: If he is not the owner of the folder, and the owner decides to delete or unshare the folder, will he be able to keep copies of the photos? The following post explains how to keep shared files in Dropbox if you are not the owner of the shared folder in question.

Before I dive into the details, a key concept to understand is who owns the shared folder. Let’s say you belong to a shared folder with a friend. If your friend is the owner of the folder, then you will have secondary permissions. What does this mean? At the very least, you will be able to view the files, or maybe edit them, and upload new files to the folder. But you won’t be able to delete them. You may also be able to invite new people to the folder, as long as the owner has granted you permission to do so (not everyone does this). Later, the owner may also decide to transfer ownership to you, at which point you would gain the power to delete files, invite new people, or make other changes.

If the owner deletes the folder, then you will also lose the files in it. However, if she unshares it she will be given the option to allow you to keep a copy (she will be prompted with a checkbox that says “I want my collaborators to keep a copy of these files.”) This second option is preferable. However, if you are not sure how your friend will handle this later on, my advice is to download the files now so you have a copy. You can then bring it back into Dropbox.

To do this, follow these steps:

  1. Log onto Dropbox.com and go to the folder in question
  2. Select all of the files in it (click the top file once so it is highlighted, then use the keyboard shortcut Ctrl-A on a Windows PC or Command-A on a Mac, or go to Edit>Select All in the browser menu).
  3. Click the download link that appears at the top of the screen (see image below).

The photos will be downloaded to your hard drive as a zipped archive (.zip) which you can then transfer to Dropbox on your hard drive or unpack it and move the files to a new Dropbox folder that you control.

Dropbox shared files download

How to permanently delete a Dropbox file (it’s not as easy as you think)

By Blog

One of the most-asked questions about Dropbox relates to deleting files. Many users assume you can simply delete or trash the file from your desktop. It won’t work! In this blog post, I’ll explain how to permanently delete a Dropbox file. If it’s still not clear, a video at the bottom of the post shows exactly what to do.

As I explain in my Dropbox guide, deleting a Dropbox file is kind of like killing a vampire. Just when you think you’ve trashed the file, it pops up alive and kicking in another location! That’s because Dropbox stores multiple copies of the same file, and the only way to kill it for good is to wipe it out from the Dropbox.com website. Several steps are involved, so please be patient while I explain the steps involved:

  1. Go to Dropbox.com, and log in
  2. Find the file that you wnat to delete
  3. Right click over the file’s name
  4. Select Delete. You will be prompted to confirm the deletion.
  5. VAMPIRE WARNING: The file is not dead yet!
  6. Click on the trash can icon at the top of the screen (it says “Show delete files” if you hover over it)
  7. The file you just deleted will reappear in the list, but it will be greyed out
  8. Right-click on it again, and select Permanently Delete.
  9. You will be asked to confirm if you want to permanently delete it. This is your last chance to change your mind, so if you are sure, go ahead and confirm!
  10. VAMPIRE ALERT: If you want to bring it back to life, right-click and select Restore.

That’s it! This method also works for people who want to delete Dropbox folders.

The video version of this post is included below:

Not enough space to sync Dropbox? How to use Selective Sync

By Blog

A Canadian reader recently contacted me about a problem. He had subscribed to Dropbox Pro and now had access to 1 terabyte of available storage space. Unfortunately, his hard disks on his Windows PC did not have enough space to sync the entire Dropbox account. How could he set up Dropbox so his hard disk wouldn’t be overwhelmed by photos and other files?

Fortunately, there is a solution. In this post, I’ll explain how to use Dropbox’s Selective Sync feature to limit which folders on your hard drive are synced.

Selective Sync is activated from Dropbox preferences. Follow these steps:

  1. Open Dropbox settings on your Windows 7 or Windows 8 computer (click the Dropbox icon in your system tray, and then the settings icon)
  2. Click Preferences
  3. Click Account
  4. Click the “Change Settings” button next to “Selective Sync” (see screenshot, below).
  5. Use the checkboxes to select the folders you want to sync to your PC. The others won’t be synced.

Here’s what the setting looks like:

Not enough Dropbox storage? Try selective sync

If you’re interested in reading more tips and tricks about Dropbox, check out the second edition of Dropbox In 30 Minutes.