
Dropbox’s Carousel app: The 1-minute review

By Blog

Dropbox offers an optional mobile app for iOS and Android called Carousel. As I described in the revised and expanded Dropbox In 30 Minutes, 2nd edition, The Dropbox Carousel app is a great way to view and share the photos stored in your Dropbox account, as well as those stored on your phone’s camera roll.

Once installed, Carousel asks permission to access the settings and content on your Dropbox app. After granting it, Carousel will display thumbnails of all of the photos and videos stored in your Dropbox account, not just those in Camera Uploads. It arranges them on a timeline which you can scroll through using a finger.

The first time you open the app and scroll through your collection, it can be quite a surprise to see photos that you shot or transferred to Dropbox months or years ago. The marketing for Carousel promises “every photo and video is safe forever.”

You can easily distribute photos in your Carousel collection to others. Once you find a set of photos that you want to share, tap the share icon. You’ll be able to select certain photos, and then email them to friends with a short message. Recipients have the option of viewing the thumbnails in the email, or downloading them to the Carousel app installed on their own phones.
Here are two views of the Carousel app. Browsing the timeline is displayed on the left, and the sharing process is shown on the right:

Dropbox Carousel app screenshots for Android

Overall, I think Carousel is a great idea, especially for those Dropbox users who use Camera Uploads a lot. However, I think some of the sharing options could be improved. The obvious target: Carousel integration with Facebook. But even having SMS or MMS support would be cool.

How big is my Dropbox video?

By Blog

A reader, Arthur, had a question after reading this post about videos being uploaded to Dropbox. He asked, “How can I tell how big is my video, before I upload it to Dropbox?” A related question: “How can I tell how big is a file in Dropbox?” Being able to determine the size of a video (or any other file) is useful not only for managing your Dropbox account (free accounts only hold a limited amount of space) but also for determining how long it will take to upload or download a file from Dropbox.

To answer Arthur’s question: To see how big a video is, there are a couple of methods.

  1. Windows: Open My Computer or the Windows file explorer and RIGHT-CLICK on the title of the video or the icon. Select “Properties”. That should show you the size of the file.
  2. Windows: In the Windows file explorer utility, change the view so it displays the column that contains the file size for each file in the open folder.
  3. Mac OS X: If you are using a Mac, find the file in Finder and right click on it and select “Get Info”.

Note that all of these methods work, regardless of whether the file is stored on your hard drive, an external storage device, a USB drive, or your Dropbox folder on your PC or Mac.

If the video on your hard drive or USB stick is huge, it’s possible to upload it to Dropbox but it may take a long time, depending on the speed of your Internet connection. I have personally uploaded or accessed videos that are more than 100 MB in size. For a file of that size, it will take at least 10 minutes on a fast Xfinity or FiOS connection, and possibly hours if you are using DSL or a slow Wi-Fi service.

It’s easy to share the video once it has been uploaded to Dropbox. For that matter, it’s easy to share any file using Dropbox (as I explained in Chapter 4 of Dropbox in 30 Minutes, 2nd Edition). Simply right-click on the file name again and use “Share Dropbox Link” (see screenshot, below). That link will be copied to your clipboard, and you will be able to paste it into an email, Twitter, Facebook, Word, etc.

How big is my Dropbox video

Dropbox: How to set up sharing

By Blog

A reader of Dropbox In 30 Minutes had an interesting question: How do you enable sharing of files and folders in Dropbox beyond your immediate connections? This short blog post explains the two basic options which allow a wider “friends of friends” sharing.

If you share links from the Desktop or Dropbox mobile app (as described in Chapter 4) that shared link can be shared endlessly. In other words, if you share a Dropbox link on your desktop or iPhone or Android phone, and paste it into an email, and then send it to Friend A, that friend can in turn forward the link to Friend Z and that person will be able to access it (even if you don’t know Z personally). Friend Z can then share it with his or her circle via email, Twitter, Facebook, etc.

If you share a folder (by clicking the rainbow icon while on Dropbox.com) you are given the option of allowing others to share. You enter that person’s email address, and then check off a checkbox that says “Allow members to invite others”. If checked, the person you shared it with can invite others to share. Here’s what it looks like:

Dropbox sharing links and folders

Of course, if you open up Dropbox sharing, there is the risk that people or organizations you may not know or trust gaining access to the files or folders.

For more information on Dropbox sharing, download Dropbox In 30 Minutes, which explains how it works and best practices for Dropbox collaboration.

Dropbox Android app: How to delete a file or folder

By Blog, Video

If you use Dropbox on an Android phone or tablet, you may be looking at the minimalist interface and wondering how to delete a file or folder. It’s easy to do, as this short, two-minute video demonstrates:

If you have to delete multiple files within a Dropbox folder, but don’t want to delete the entire folder, the Android app will slow you down. In such cases I recommend you handle deletions on the desktop. The video How To Permanently Delete Multiple Files in Dropbox, explains how.

For more tips on how to use Dropbox for collaboration, backing up files, and making it easier to manage photos, check out the contents for Dropbox In 30 Minutes.

What’s the longest video you can add to Dropbox?

By Blog

Tonight a reader of Dropbox In 30 Minutes sent me an email asking about the longest video that can be added to a Dropbox account. It’s a common question. People are used to hitting the 10-minute or 15-minute limit on YouTube, and it’s natural to think that Dropbox has similar caps.

But here’s the thing: There is no time limits on videos. The only limit is the size of the video, which must be less than the amount of free space in your account. So, if you have a free 5 GB Dropbox account, and have .5 GB of photos and Word docs in there, that means you can upload an additional 4.5 GB of other stuff. The other stuff could be a gigantic video file, or a bunch of smaller video files, or anything else whose size is less than 4.5 GB total.

Note also that the bigger the video files are, the longer they will take to sync. For this reason I usually sync videos that are less than 150 MB in size, which might take 20 minutes to sync to Dropbox on my wireless Internet connection at home (Comcast Xfinity).

Once the video is in the Dropbox folder, you can either share the link to the video or share the folder with your friends so they can access the videos and add their own materials if they want. Keep in mind that there are security and privacy considerations around both of these methods of sharing, covered in Chapter 4 of Dropbox In 30 Minutes (available as an ebook and in paperback and PDF formats. You can buy the guide here).

Dropbox Video Length

What is Camera Uploads, and how to manage photos in Dropbox

By Blog, Video

If you are new to Dropbox, you may have seen a folder called “Camera Uploads”. What is Camera Uploads? It’s a feature in the Dropbox mobile app that automatically syncs the pictures you take on your smartphone (iPhone, Android, etc.) and automatically uploads them to your Dropbox account. This short blog post and the two videos shows how Camera Uploads works, and how you can manage the storage space and photos in it.

As you can imagine, Camera Uploads takes care of a big problem — syncing photos between your smartphone and PC. It happens wirelessly in the background when the app is turned on, so you don’t even have to think about it.

But Camera Uploads causes a few problems:

  1. The uploaded photos and movies eat up your Dropbox storage space
  2. The photos aren’t organized into albums

The following video and the linked blog post I wrote earlier this year show you how to manage Camera Uploads. The video shows you how to delete photos, either one at a time or in batches. The blog post shows you how to use Dropbox Photos, to organize the pictures in Camera Uploads into albums.

For more information about Dropbox and how to get the most out of the desktop and mobile apps, download the ebook or buy the paperback version of Dropbox In 30 Minutes. For more information about Dropbox, visit Dropbox.com.

Video: Manage the Camera Uploads folder

Blog post: What are Dropbox Photos, and how can they help you organize images?

Unshare a Dropbox folder: Quick tutorial

By Blog, Video

If you use Dropbox for collaborating with colleagues, classmates, and other people, eventually you will have a scenario that requires you to unshare a Dropbox folder.

What is a shared Dropbox folder? As explained in Dropbox In 30 Minutes, sharing the contents of a subfolder means at least one other collaborator will be able to add, delete, or change files in a folder that you “own” (that is, you created it, and added files, photos, or other content to it). It doesn’t matter if the other users have different operating systems. There is no limit to the number of other Dropbox users who can share a folder.

Why would you want to unshare a folder? Typically, you no longer need to work with the people who you granted access to. Maybe the project or class assignment is over, or someone left the company. Whatever the reason, you want to end their shared access. However, as shown in the video below, there are ways to give the other people in the folder access to copiies — or make sure that they don’t have access to copies of the files, even if they added some of them to the folder!

This short video tutorial shows you exactly what to do to unshare a Dropbox folder. To learn more about sharing, consider purchasing our Dropbox guide.

What are Dropbox Photos, and how can they help you organize images?

By Blog

Today I received a notice from Dropbox that I had access to a new feature called Dropbox Photos (also called “Dropbox Albums” in the email announcement I received). What are Dropbox Photos? In a nutshell, they are an easy way to organize images in Dropbox and share them with friends and family members. In this short post, I’ll describe how to use the basic features of Dropbox Photos. There’s a screenshot below which shows the most efficient method of moving images to a Dropbox album that you’ve created.

If you’re a heavy Dropbox user, you probably have hundreds or even thousands of images stored in various folders. I think my case is typical — over the past few years, when people have emailed me photos, I have saved some of them to a special folder I created in Dropbox, so I could transfer them later to iPhoto. I also have Dropbox enabled on an iPod touch, iPad and Android phone, which means that every time I take a photo or create an image using those devices, a copy is saved to Dropbox’s Camera Uploads feature.

The problem: The images are scattered across multiple folders, and it’s hard to find and organize them. Many of the photos have the default file name given to them by the camera or tablet (such as DCN1234.jpg).

Enter Dropbox Photos. The idea is to let people easily select individual or multiple photos stored in a Dropbox account and instantly assign them to albums that you create, such as “Hawaii 2013 Vacation” or “Pictures of Fluffy”. It’s very easy to do. The Dropbox Photos application is built into Dropbox.com, and located at dropbox.com/photos. It apparently shows all of the images in all folders, arranged in thumbnails in reverse-chronological order (e.g., the newest ones on top). To create an album, click the “Create New Album” button to the left. You can then click on individual thumbnails to select the ones that you want to move to the album, and drag them over to the name of the album. They are instantly added to the album.

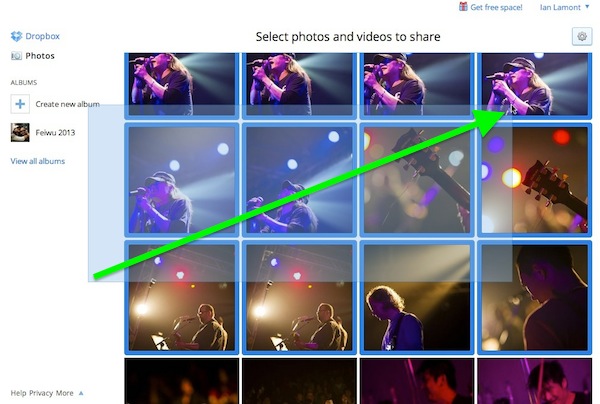
An even better approach: Click outside of the thumbnails and hold the mouse button down as you drag over multiple thumbnail images. A translucent rectangle will appear, and as it covers the thumbnails, they are highlighted. Once you are done selecting a group of photos, release the mouse, and drag the highlighted images over to the name of the album that you want to drop them in. The screenshot below shows the path of the pointer as 12 images are highlighted and later dragged over to the Dropbox Photos album I created called “Feiwu 2013”:

Dropbox Photos how to select

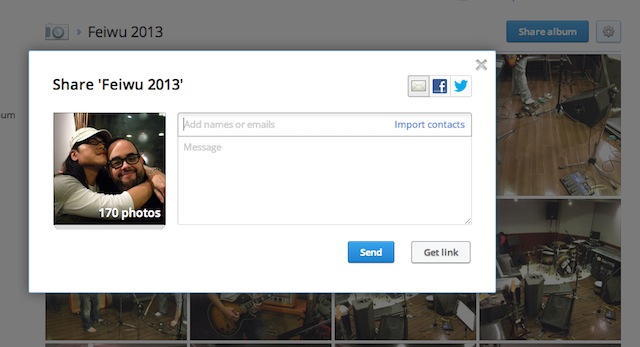
Once the album has been created, you can select it to view the pictures. To share the album, click the name of the album, and press the blue “Share” button on the top of the browser window. Then, enter email addresses or press the Get Link button to get a link which you can paste into a document, Twitter, Facebook, etc.

Dropbox share photos

As described in “Dropbox In 30 Minutes”, shared links are not private — if anyone copies or forwards them, they can be seen by other people you may not know.

While this is a cool feature, and definitely an alternative for users of iPhoto, Picasa, and other online and offline photo applications to worry about, one thing that may keep many people from using it are the limits on storage for free Dropbox accounts, and the relatively hefty cost for upgrading to a paid Dropbox account to handle lots of photos — Dropbox Pro currently costs $10/month, which is a lot more expensive than iPhoto and other desktop applications. On the other hand, the Share feature and automatic synchronization from mobile phones (via Camera Upload) are attractive features for many. We’ll see how it shakes out …

How to kick out other users from a shared Dropbox folder

By Blog, Video

In less than 3 minutes, the following video will demonstrate how to kick out another user from a shared Dropbox folder. “Kick out” may sound mean, but it’s actually the term Dropbox uses!

Why would kicking out another user be necessary? Perhaps the other person no longer needs to collaborate on the files in the folder, or he or she has been fired. Whatever the reason, this video shows how to review and select other users for ejection.

This method of kicking out other people can be used by owners of shared Dropbox folders. If you are merely a member of the shared folder who was invited by the owner, you can’t kick anyone out — but you can leave (explained in this video). The video also describes some special considerations relating to files contributed by the person being kicked out.

The narrator of the video is the author of “Dropbox In 30 Minutes”, a quick guide that not only explains how to set up Dropbox, but also shows how to leverage special features for collaboration and document sharing. See the contents of the guide here, and view purchase options here.

To view the video full-screen, press the rectangular icon at the bottom of the YouTube video player:

Dropbox tutorial: How to leave a shared folder

By Blog, Video

If you use Dropbox to collaborate, you may be wondering how to leave a shared folder. The scenario may be you no longer need to collaborate with the other people in the shared folder. Or you want to free up more space on your Dropbox account — leaving a shared folder means the files inside it no longer count toward your Dropbox total.

This 2-minute video demonstrates how to leave a shared Dropbox folder that a friend, colleague, or someone else created and invited you to join. It shows the steps required to find and leave the folder, and the options to keep copies of the files.

This and other techniques are explained in depth in Dropbox In 30 Minutes, available as an inexpensive paperback, ebook, PDF, or file download. Visit this page to see what’s inside, and learn about purchasing options here.

To watch the video, press the player button below: